Jan 31, 2015

Flip Over this Altered Thinlits Circle Card . . .

Happy Saturday my crafty Peeps!
I Saw instructions for this card on Stampin" Georgia's blog last year and thought it would work with the Celebrate Today Photopolymer bundle.  
I love the card I'm sharing with you today! 


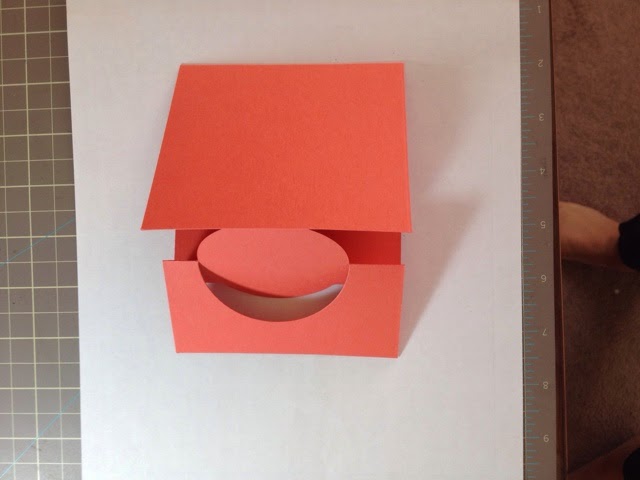
Here is how to use your Circle Card Thinlit in a whole new way....  Begin with a 4-1/4" x 11" piece of cardstock (half of your 8-1/2 x 11 cut in half the long way). Place the cardstock on your magnetic platform with the die, make sure cardstock goes over the thinlit edge instead of under on the one side.


Fold on the score lines created by the thinlit (first one back, second one in) then place in upper left corner of Simply Scored Tool and score @ 5 1/2".  Fold in on 5 1/2" score line. 

Now we can decorate!!  I chose to use the Best Day Ever DSP, and the coordinating Inks, along with some glitter paper and Rhinestones.

Hope you like it!!
Hugs, Karen
Built for Free Using: My Stampin Blog

Jan 30, 2015

Bee Happy!

'Bee Happy' project using the lovely little bumblebee from the Honeycomb Hello Clear-Mount Stamp set paired with the honeycomb patterned papers from the Moonlight Designer Series Paper Stack.

I used the Naturals White Cardstock as my card base, I love the textured homemade paper look of the card-stock, then embossed with the honeycomb embossing folder. The pennants were cut using the Banners Framelits Dies and the Hello Honey and Blackberry Bliss Honeycomb patterned papers to create my layers. I also used a length of Blackberry Bliss Satin Stitched Ribbon as an extra embellishment. 

I cut a strip of Hello Honey cardstock to make my banner and stamped the Bee Happy sentiment.  As I accidentally made my banners a little short, I added 3 rhinestones in the right corner to try and balance things out.  This is not how I imagined the card to turn out, so stay tuned for more Bee cards...


Hugs, Karen


Built for Free Using: My Stampin Blog

Jan 28, 2015

Craft Supply Inventory

OK, so I made an Excel inventory spreadsheet for my Stampin' Up! products and am now in the process of doing one for my other craft supplies.  
Screen shot of my spreadsheet
That's not weird is it?  

I mean, I just got a little tired of not remembering what I had and didn't have.  Buying doubles is fine for some things, but not for others, you know what I mean?  "can we say hoarder"
Stampin' Up business supplies etc.

Stampin up drawer full to the brim with stamps, ribbon and other little giveaways

New cube storage, copics store in bin, new stamps on shelf

Side view from desk, more stamps stored on shelf
I have been working on this for a couple of months (years).  I think I have everything I want done.  (except for all of my Non Stampin' Up! paper and collections) see photo of paper storage.  I think it is awesome except I now want to have some sort of planner/binder with printed out copies to have within reach when I am in a creative mood.  I have seen lots on Pinterest where they emboss paper to show what they have, photos of the stamps (good idea) my Stampin' Up! products are easy it is the others that give me grief figuring out storage etc.
DSP Storage

Stampin' Up! Cardstock

Misc paper etc.  still needs sorting
I just have to remember to use it when making supply wish lists and to take a copy with me when purchasing certain things.  

Being a bit of a computer geek, I have a Copic app on my phone and iPad, it is awesome way to know what you have. I also found a bunch of printables on the Ranger site and  there is a printable for the Blendabilities on Pinterest.  Go check it out!  The link will take you to the page where there are a ton of color sheets and label sheets to print out and use to help organize your stuff.


Copics inside one of the bins
My desk top.....
Promarkers


Blendabilities


Spinning Tool Caddy with my scissors, Stampin Up write markers etc.


Stampin Up ink storage
Love my new jar for my sponges (also label each sponge with colour name)
I sold most of my Cricut cartridges last year but I do have a list of my Cricut Cartridges.  I double spaced it so that I have room to add more.  (Wish I had a Silhouette Cameo instead - insert sad face)

Cricut boxes
For now I am hoping to put together a full size three ring notebook even though this size will be hard to handle.  LOL (I have a lot of stuff, but I have been crafting for decades)

To store my Dies, I start by cutting the tabs of each set when I get them using the Steel Snips.  The Die sets that come with multiple pieces are often attached, and the Steel Snips make quick work of separating them.  I place all of my Stampin Up Dies and larger Die sets into the Sizzix Storage Pockets.  I label each set using an inexpensive Brother Label machine. Pictures of my dies...all divided into categories of company (Dividers are in process of being made).

Dies storage - medium box

Oversized dies and some embossing folders and Stencils
Embossing Folders.....


Embossing folders
Punches ....

Stampin Up Punches
..and more Stamps, OH MY!

Various stamp collections

Unity Stamps

Embellishments ....


Embellishment Holder and my Embossing powder holder


Embellishments and ribbons

And, I now have to have a washi tape collection inventory. 
Washi tape dispensers, already need another unit
Stickles....


Stickles, I need to inventory which ones I have
Under desk, Stamps of Life binder and scrap paper storage
Mixed Media storage
To be organized.....

More craft stuff to organize in spare bedroom
Bags of stamps, embellishments and books to sell
Misc Scrapbooks, felt, bags etc.

I am also going to organize my knitting, crochet and cross-stitch supplies (they are in the basement).  I will need the information for that also!

What do you think?  (Not about how much I have hoarded in the last 2 years and stuck in every nook and cranny of my house!  What do you think about my spreadsheets, Apps and eventually my book?  Hee Hee!) Believe it or not I still cannot find things ie: 2" circle punch

Stay crafty, and ORGANIZED, Peeps!

Hugs, Karen


Jan 27, 2015

Embossing Folder Heaven - Weekly Deals

Happy Tuesday my crafty Peeps! 

Wow, if you like embossing folders then you will like this Weeks Deals!!  

Simply visit my ONLINE STORE and see all the Clearance items as well as the Weekly Deals and order all the great products on sale!  It will be delivered straight to your door!


If it’s your first time Online shopping with me then you will need to create your profile and tick “allow Demonstrator to contact me”, so that I can send you a thank you card. 

If you do not wish to shop online, you are more than welcome to contact me and I will place your order for you, but please remember this sale is “WHILE SUPPLIES LAST” and they go very quickly!  So hop to it!

Hugs, Karen


Built for Free Using: My Stampin Blog

Jan 26, 2015

600 Facebook Likes Giveaway Winner !!!

We recently hit 600 likes on Facebook thanks to you lovely followers and I am even more excited that my Instagram is over 100 followers. 

So on top of the original giveaway of a 6x6 DSP paper sample, won by Mary Ann Oshust, I wanted to do another SPECIAL GIVEAWAY to celebrate! 
I can't thank you enough for the support because I couldn't do this without you!

YOU MUST FOLLOW MY FACEBOOK PAGE AND COMMENT TO QUALIFY 
(must be a Canadian Resident)

The Prize for this giveaway is as follows:
All Is Calm Snowflake Embellishment
Rhinestone Basic Jewels Embellishments

When the Giveaway ends we will choose 2 winners, one for each prize being given away. All we ask is that you help spread the word about the Giveaway via Google and Facebook so more people have a chance to enter! Once again we thank you from the bottom of our Stamp loving hearts for all your support!

Please note:  All entries that are left blank where additional info is requested will be removed.   I will announce the Winner 48 Hours after the close of this giveaway which ends March 15, 2015. The winner will be contacted via email and you will only have 24 hours to reply. Please check your email spam folders, I can not be responsible if you do not check your spam folders.

Jan 23, 2015

Happy Birthday!

Good evening my crafty peeps!

Wow, I slept over 16 hours last night so not to much card making was going on, but I did make a Birthday card for my Step-mum Leah.  I bought this stamp several years ago with her in mind and am now only using.  It is not a Stampin Up product but the rest of the card was done with Stampin Up!


Details: (recipe)

  • The base is 5 1/2" x 8 1/2" Crushed Curry, folded in half.
  • The 4" x 5 1/4" layer of paper was Island Indigo, with a layer of  3 3/4" x 5" piece of Watercolour Wonder DSP
  • 4" x 2 1/2" Whisper White layered on a 4 1/4" x 2 3/4 piece of Island Indigo card stock.
  • The image was stamped with Memento black ink on the Whisper White and coloured with Copics and Stampin' Up! Belandabilites. It was placed on the front with Stampin’ Dimensionals.
  • Happy Birthday was stamped with Crushed Curry on Whisper White and cut out with the Itty Bitty Banners Die and added to the front.
  • Added 3 Rhinestones to the side and wound some Crushed Curry Bakers Twine around the whole thing before attaching to the card base.
  • Inside is a 4x5 piece of Whisper White and using the  stamp set, with Crumb Cake and Island Indigo ink. 

Hope you like it!
Hugs, Karen


Built for Free Using: My Stampin Blog

Jan 21, 2015

Weekly Deals!

YAY! I love love love Tuesdays!!!!

Weekly deal time! this week its GREAT NEWS if you are needing Blendabilities! lots of FABULOUS specials for Stampin' Write Markers and Bakers Twine! If you DON'T have any this week is a BRILLIANT TIME!! click any of the products to make a purchase- it will take you directly to my store!

Have a great week, and I hope you manage to squeeze in some creative therapy!!

Built for Free Using: My Stampin Blog

Jan 18, 2015

Will you be my Mystery Hostess?!

What is a virtual workshop? 
A virtual or online workshop is one where you can place an online order and enter the hostess code provided below. Your order, which ships directly to you, AND it also earns Stampin’ Rewards for the hostess (aka: Hostess Rewards).    By using the hostess code, you're adding your ordered merchandise total to the overall total of the virtual or online workshop.  If the total reaches $200 in sales before shipping and tax… one lucky stamper will receive $35.00 in FREE Merchandise.  If the overall total reaches a higher tier, he/she will earn 1/2 off items plus a higher amount of  Hostess Dollars.  See the Hostess Chart Below.

My virtual workshop starts February 3rd  and ends at midnight  February 6th. On Saturday morning February 7th, I’ll put all names in a random drawing and one lucky Stamper will get to choose the FREE MERCHANDISE using the Hostess Dollars accumulated.  

Here’s how to join the fun!!!

  • If you do not live locally, you can still participate! Simply place an online order, no later than Midnight on Friday, February 6th, at and use the Hostess Code RYPURB6A.  Your order will ship directly to you.  If your name is pulled for hostess benefits, your free goodies will be shipped separately.
  • If you live locally, you can order online or you can contact me directly with your order and I will place it (possibly saving you some  shipping costs.)
  • Your name will be entered into the drawing once for each $50 worth of merchandise (before tax and shipping) you purchase.  Don’t forget, you can still get Sale-A-Bration freebies for each $60 in merchandise you purchase!
  • I will draw one or more names for hostess benefits at 10 A.M. Saturday morning and email you to pick your hostess benefits.
  • If you place an order of $100, I will have a special little gift for you!
  • You never know, I may just choose to pull a name or two for a Giveaway too!
I look forward to hearing from you in the next few days!  I do want to mention, if you are planning to place an order of $200.00 or more, go ahead and give that to me or place it online without the hostess code.  You earn your own hostess benefits with that order and you don’t want them to be given away to someone else!
Will you be my Mystery Hostess?!


Hugs, Karen

The Dog Who Knew Too Much by Krista Davis

Hello my cozy friends, Today I am reviewing "The Dog Who Knew Too Much” the 6th instalment in the "Paws and Claws” Mystery series ...