Apr 26, 2016

Chocolate Bar Wrappers!!

Hello my crafty peeps!!

Another project for the craft fairs is the chocolate bar wrappers, Marie and I have been working on a few designs... Believe me we had a few frustrating moments where the paper went in the garbage with a few explicit words.

But I think we have a few ideas sorted out now.  I have been tasked with making 12 of each size this week.  I have not finished even one yet.  Can I do it??


Stay posted for dimensions and finished products!!

If I can give you just a little inspiration, where you can look at one of my cards and think I can do that, or I could tweak that and put my own spin on it, then I am achieving what I have set out to do! 

P.S. Please share. with your friends and leave me a comment below. I read them ALL!

Hugs,

Apr 16, 2016

Black and White Card Box ....

Hello my friends,

Today I am still showcasing the items we made at Wednesday's Tea and Crafting, Marie showed us how to make this card box cased from Brandy Cox's video.


Directions:
  • Cut a piece of DSP or a stiffer card stock to 11″ x 11″.  
  • Using a Simple Scored diagonal plate and starting at the top and scoring in a downward diagonal…  score your card stock on a diagonal at 4.5″ and 6.5″.  Now using the left side of your simple scored… score your paper in a downward diagonal 4.5″ and 6.5″.
  • Flip your paper 90 degrees.  Again using a Simple Scored diagonal plate and starting at the top and scoring in a downward diagonal…  score your card stock on a diagonal at 3.5″ and 5.5″.  Now using the left side of your simple scored… score your paper in a downward diagonal 3.5″ and 5.5″.
  • Find the coated side of your card stock if you have one and use StazOn black ink and the stamp set of your choice to begin stamping your decorative box. You have 4 larger triangles… find the two smaller ones and start at one size and make your way all the way across the box.   As Brandy says, its okay to stamp over the score lines as this will give your box a professional feel as the image wraps around the box.   Now fold and prep your box.
  • Trim all the tiny corners… there are 8 total. You will also want to cut your flaps. Determine which end of your box is the bottom flap and trim the little corner off at 3/4″ so its neat and tailored when opened.  Now your ready to assemble your box.  
  • The black piece for the top flap of your box and the bottom flap of your box measures 6.5″ x 5-1/2″ and score the 6.5″ side down at 1-3/8″  This will cover both your top flap and box flap of your envelope  
  • After adhering the top of your 6.5″ x 1-3/8″ to the top or bottom flap you can then use the box template to trim your triangles perfectly.
  • The sentiments are ones we found in my box of stamps and I used left over white card stock to stamp on.  I centered it on my box and glued it down.  Trim off the remainder.  
  • We used velcro for the closure but you can use a magnet per the video.
  • On the flower we used some Wink of Stella and a Iced Rhinestone.
  • Please watch Brandy's video for more exact instructions

Hope you like our version!

If I can give you just a little inspiration, where you can look at one of my cards and think I can do that, or I could tweak that and put my own spin on it, then I am achieving what I have set out to do! 

P.S. Please share. with your friends and leave me a comment below. I read them ALL!

Hugs,

Apr 15, 2016

Hang in there!!

Hello my crafty peeps!

Today's card is a cute card that is good for a birthday or just because...
I say the idea on Pinterest and then my friends made one on the weekend at my day crop and I decided to do at Tea and Crafting on Wednesday.....

A few years ago I received a fun cloud background stamp as a free gift from Unity Stamps and I thought it would be a great time to use it.  I used the Every cloud has a silver lining ~ You just have to look up to see it sentiment on the inside of mine...

Hope you like it!!

If I can give you just a little inspiration, where you can look at one of my cards and think I can do that, or I could tweak that and put my own spin on it, then I am achieving what I have set out to do! 

P.S. Please share. with your friends and leave me a comment below. I read them ALL!

Hugs,

Apr 14, 2016

Gone Fishing .....

Hello my crafty peeps!

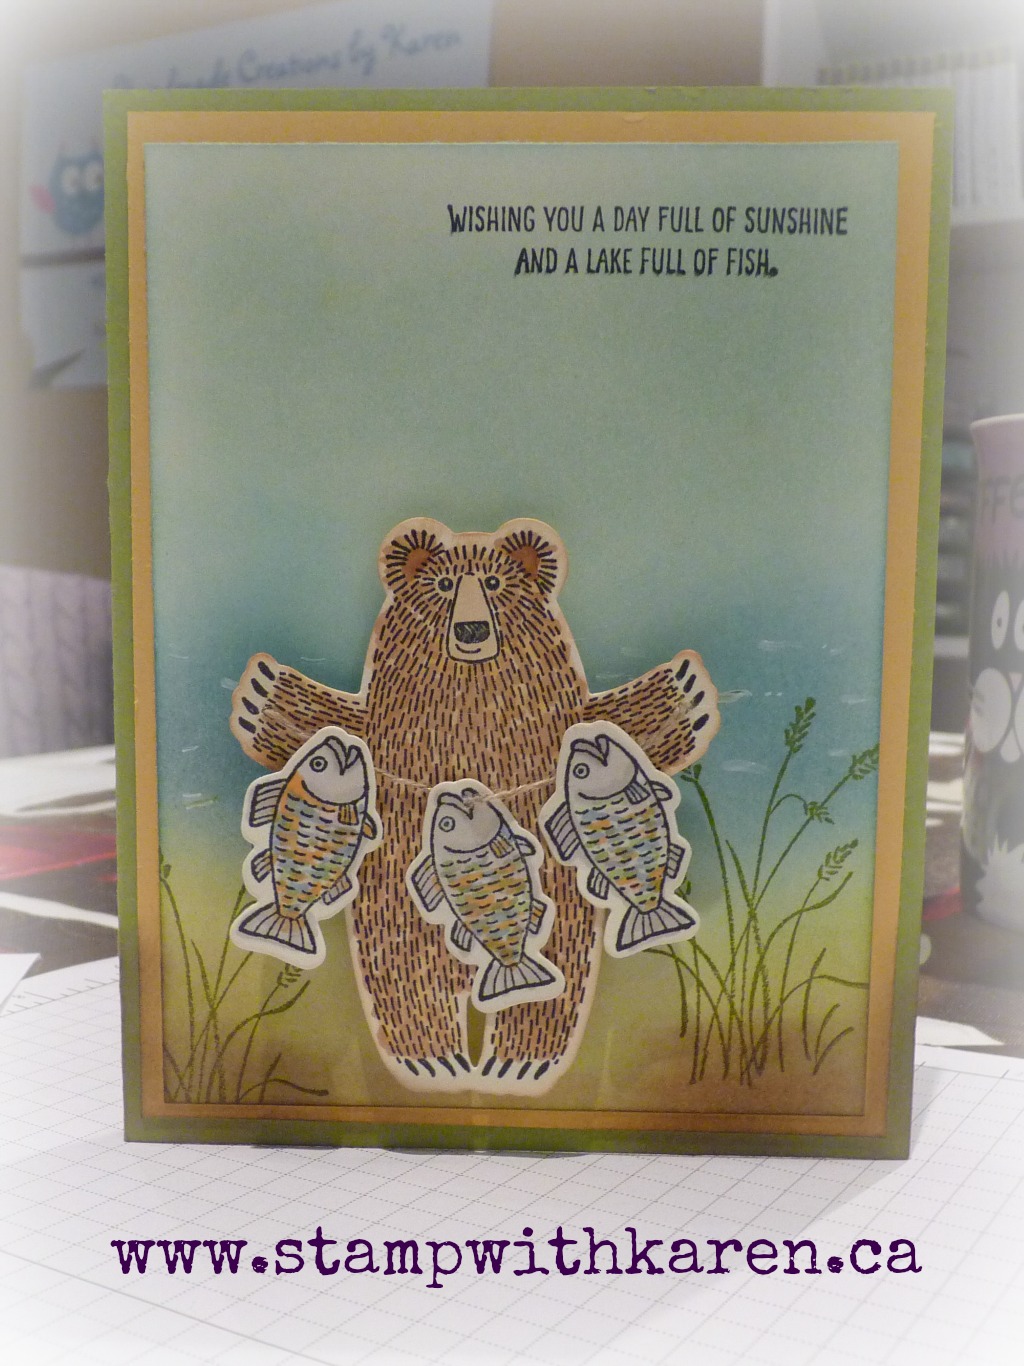
Yesterday at Tea and Crafting we decided to use the Bear Hugs bundle from Stampin' Up!
we used sponging, and copics.


Cindy - with her finished project
The idea of sponging the background, I cased from Frenchie 's video Beach Time... Thought this would work as a lake setting if i just switched up the colours.  I liked the idea of using the white gel pen to mimic the waves or ripples on the water.

Cindy's version (copics used on bear)

Marie's version (sponged bear)

Directions:

  • Old Olive 4¼ x 11 score at 5½ 
  • Crushed Curry 5¼ x 4 
  • Very Vanilla or Whisper White 5 x 3¾ (2 pieces)
  • Sponge with Crumb Cake, Baked Brown Sugar and Old Olive on base about 1/3 of the way up.
  • Sponge with Marina Mist, touch of Tempting Turquoise for the lake then switch to Soft Sky
  • stamp in Old Olive the grass from the Wetlands set then sponge with Baked Brown Sugar at grass base.
  • Using the white gel pen make small lines to look like ripples on the lake.
  • Stamp your bear in Memento and then either sponge in Crushed Curry, Baked Brown Sugar and Chocolate Chip or colour with Copics or Promarkers.
  • Colour  3 fish with Copics or Promarkers and then top them off with clear Wink of Stella.
  • With your poker poke holes in paws and thread some line thread through for your fishing line.
  • Then choose a greeting.
  • on the inside you can stamp a fish or something to spruce it up!
Hope you like them!


If I can give you just a little inspiration, where you can look at one of my cards and think I can do that, or I could tweak that and put my own spin on it, then I am achieving what I have set out to do! 

P.S. Please share. with your friends and leave me a comment below. I read them ALL!

Hugs,

Apr 12, 2016

Last of the Weekly Deals and Mothers Day card


Hello my crafty peeps!

The weekly deal program is ending as Stampin' UP! plans on mixing things up. They are ending with a big bang, check out this weeks amazing deals!  Happy Shopping everyone, I know I'm off to do the same.
Had coffee with a few friends this morning and managed to get 3 cards finished.  This is one of the ones I worked on.


If I can give you just a little inspiration, where you can look at one of my cards and think I can do that, or I could tweak that and put my own spin on it, then I am achieving what I have set out to do! 

P.S. Please share. with your friends and leave me a comment below. I read them ALL!

Hugs,


Apr 8, 2016

5"x3" Memo Pad holder with Pen

Hello my crafty peeps!

You might of seen this project on my facebook page (original idea cased from Gerriann Armstrong) but I thought I would share the directions with you ...

To begin cut a piece of cardstock at 5" by 8 3/8" , 1 1/2" by 5" and 1 1/2" by 3 5/8"
  • Score on the 8 3/8 inch side at 3 5/8", 4", and 4 3/8"
  • Fold on center line
  • Cut from the edge to the middle score line about 1 1/2" from the top making a notch about 1/2" wide for the pen holder.
  • Open and add scoretape between the middle and the last score line. DO NOT add tape between the cut lines as this is for the mini pen holder.
  • Fold the back cover over to the front cover on the last score line.
  • Open piece again and remove the score tape, fold the back over to the front cover and burnish the adhesive.
  • Add the 1 1/2" by 5" cardstock at the bottom of the notepad and close the notepad on the cardstock, and fold the edges of the paper to the back of the notepad.  Add adhesive to the folded cardstock and slide cardstock to the top of the notepad. 
  • Adhere the memo pad centered into the back piece of the memo pad cover. There should be about 1/8 inch boarder.
  • Using a blunt end of your paper piercer or pencil eraser gently push out the pen holder slot.
  • Crease the cardstock on the first score line to create the cover. Slip the pen into the notch created.
  • Round the corner on the 3 5/8" x 1 1/2" piece of cardstock.  Add liquid glue to one long side and one short side to create a pocket. Adhere the pocket to the inside of the front cover.
  • Decorate with DSP cut at 4 3/4" x 3 3/4" for front cover and 1 1/4" by 3 2/8" for pocket.
  • Then embellish as desired.
  • Oops! almost forgot to say that we rounded the corners


Hope you like this project!

If I can give you just a little inspiration, where you can look at one of my cards and think I can do that, or I could tweak that and put my own spin on it, then I am achieving what I have set out to do! 

P.S. Please share. with your friends and leave me a comment below. I read them ALL!

Hugs,

Apr 6, 2016

Weekly Deals April 5th to April 18th

Hello my crafty peeps,

The word has it that the "Weekly Deals" will be replaced with a less frequent promotion called "Special Offers". YEAH!!! 

These Special Offers will occur every few months as inventory allows with more products and discount tiers than Weekly Deals (offers may vary per market). 

The last sets of Weekly Deals will be April 5-18. 


Don't forget the In-Colors that will be leaving. If you own the stamp pads do yourself a favor and get the Refills before they are gone...which will be very soon.   
If you love the Card Stock that goes with these make sure to stock up as well. 
These will go out on the Retiring List on the 17th. When they do they will be gone in a flash!!!


Hugs,

The Dog Who Knew Too Much by Krista Davis

Hello my cozy friends, Today I am reviewing "The Dog Who Knew Too Much” the 6th instalment in the "Paws and Claws” Mystery series ...